Chocolate Drifter
Moderators: LilRay.Sun, Furai, Growler, zorruno, jif

-
last_resort14
- I have stars and not afraid to use them

- Posts: 252
- Joined: Tue Dec 30, 2008 1:27 pm
- Location: Hamilton
Knuckles will be happening as soon as I have the car back up on axle stands.
The Iconcept rack ends do definately make a difference, my brake lines are pulled tight as is is, but I believe this may be because I have 1.6 brake lines and 1.8 brakes.
I will be making the knuckles as extreme as I can without the rims hitting the arms, and then getting brake lines to suit afterwards.
-
Kieran
- I am quitting my job and going 5-ing

- Posts: 686
- Joined: Sat Dec 25, 2010 4:57 pm
- Location: Auckland, NZ
Factory lines will not fit if you modify the knuckles at all even a less aggressive knuckle will require at least a 1.5-2" extension of the front brake lineskuroneko wrote:Will you be planning to go to knuckles later? Or just stick with those iconcept RE's? I'm looking to do knuckles, but not sure if the factory brake lines will reach on full lock?
-
last_resort14
- I have stars and not afraid to use them
- Posts: 252
- Joined: Tue Dec 30, 2008 1:27 pm
- Location: Hamilton
Slowly getting there with this car.
Have sanded the gloss off the whole interior ready for paint, vacuumed it all out and wax and grease removered everything so its nearly ready for paint.
Had another look at the front end of the car. Figured a way of mounting my radiator.

Ignore the rust
This is what I have come up with, its just a U shaped bracket for the radiator to sit into, which sits on a little leg on the front bar.


Have got the passenger side one ready to mount, and have made the leg for the drivers side one but ran out of the angle iron I was using for the U bit, so will finish that tomorrow.
Hoping for some good weather on sunday or maybe monday so i can throw some paint on the interior.
Have sanded the gloss off the whole interior ready for paint, vacuumed it all out and wax and grease removered everything so its nearly ready for paint.
Had another look at the front end of the car. Figured a way of mounting my radiator.
Ignore the rust
This is what I have come up with, its just a U shaped bracket for the radiator to sit into, which sits on a little leg on the front bar.
Have got the passenger side one ready to mount, and have made the leg for the drivers side one but ran out of the angle iron I was using for the U bit, so will finish that tomorrow.
Hoping for some good weather on sunday or maybe monday so i can throw some paint on the interior.
-
last_resort14
- I have stars and not afraid to use them
- Posts: 252
- Joined: Tue Dec 30, 2008 1:27 pm
- Location: Hamilton
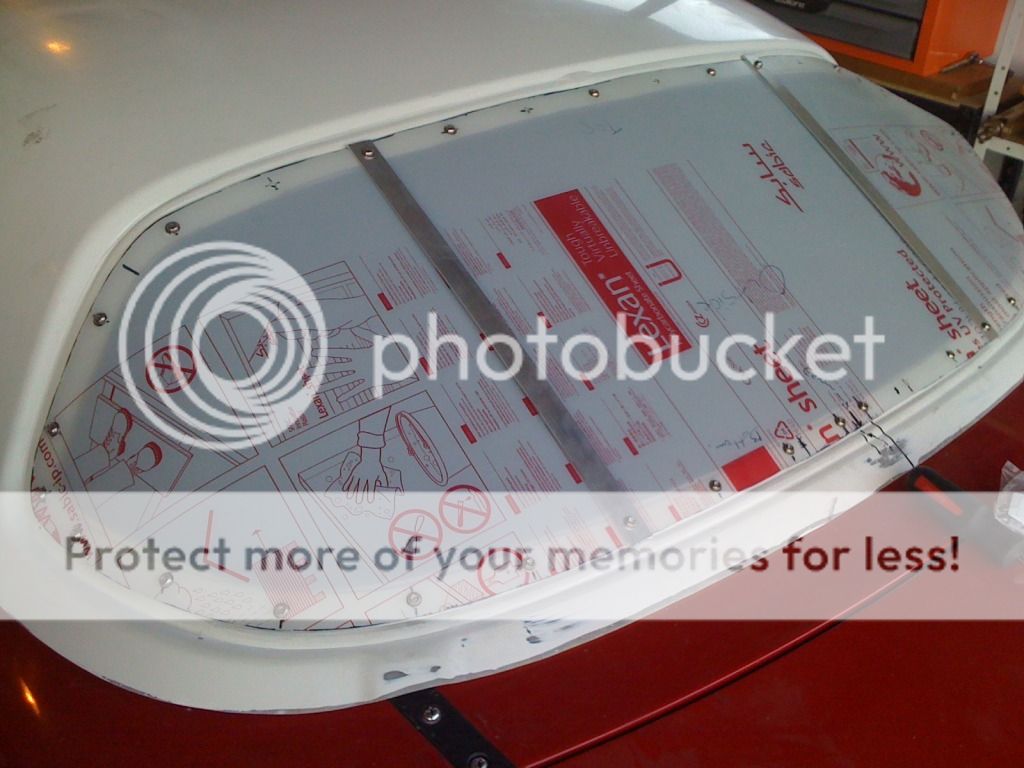
Had a look at my fibreglass hardtop skin today.
Made a template up for the rear window, for when I get some polycarb to cut out

Didnt really know of the best way to make this template, but this worked, haha.
Then got out the jigsaw and cut out the rear window, leaving a 25mm strip around the edge to fasten the rear screen to.

Made a template up for the rear window, for when I get some polycarb to cut out
Didnt really know of the best way to make this template, but this worked, haha.
Then got out the jigsaw and cut out the rear window, leaving a 25mm strip around the edge to fasten the rear screen to.
-
last_resort14
- I have stars and not afraid to use them
- Posts: 252
- Joined: Tue Dec 30, 2008 1:27 pm
- Location: Hamilton
Well the weather finally played ball over the weekend just been, so managed to get some paint down on my interior.


These pics were taken after the first coat,
There are sooooooooo many little spots that its near impossible to get paint into when your holding a fairly large paint gun, made worse by the fact that somebody stuck a whole heap of bars in there
managed to get most of it covered with at least a little paint though.
-
harlansmart
- I count 5-s in my sleep
- Posts: 322
- Joined: Tue Jun 07, 2011 10:43 pm
- Location: Swashbucklers, Westhaven, Auckland, New Zealand
-
last_resort14
- I have stars and not afraid to use them
- Posts: 252
- Joined: Tue Dec 30, 2008 1:27 pm
- Location: Hamilton
Quick shot of the Completed interior paint

Used my awesome rubbish sack template to cut out the rear screen from a sheet of lexan.
started to bolt it on

Used every M6 nut and bolt I could find in my garage to bolt it all down and wrap the sheet around the curve


Really happy with how this has come out, should look really good when done.
Used my awesome rubbish sack template to cut out the rear screen from a sheet of lexan.
started to bolt it on
Used every M6 nut and bolt I could find in my garage to bolt it all down and wrap the sheet around the curve
Really happy with how this has come out, should look really good when done.

-
last_resort14
- I have stars and not afraid to use them
- Posts: 252
- Joined: Tue Dec 30, 2008 1:27 pm
- Location: Hamilton

-
last_resort14
- I have stars and not afraid to use them
- Posts: 252
- Joined: Tue Dec 30, 2008 1:27 pm
- Location: Hamilton
-
Growler
- Yes. I might just know (Trusted Advisor)
")
- Posts: 433
- Joined: Sat May 06, 2006 8:25 pm
- Location: Auckland
I thought 6mm would be overkill to hold the acrylic/polycarbonate down - especially if you are looking to save weight.
Polycarbonate is very strong and is highly unlikely to crack like Acrylic (Perspex).
I have used 3.0mm PETG Sheet (Same family of materials as Coke bottles) for the side windows of the race car and that is held down by 3mm countersunk setscrews.
The front screen is flame hardened Polycarbonate (So it doesn't scratch) and that is held down by the same size 3mm screws.
Just my 2 cents worth...
-
Snapfrozen
- I am quitting my job and going 5-ing
- Posts: 747
- Joined: Sun Jun 24, 2012 11:58 am
-
last_resort14
- I have stars and not afraid to use them
- Posts: 252
- Joined: Tue Dec 30, 2008 1:27 pm
- Location: Hamilton
Yea the 6mm bolts are probably overkill, not really worried about weight though, and the holes are drilled now, so no going back 
To be street legal it has to be lexan MR10 or the equivalent from another manufacturer, and at least 5mm thick(from memory)
Mines only 3mm thick, and only the lower grade lexan, the MR10 stuff was about 4 times the price.
I also Have to put 2 metal straps on the outside of this window, minimum of 25x3mm, so will put these on using some of the 6mm bolts
-
last_resort14
- I have stars and not afraid to use them
- Posts: 252
- Joined: Tue Dec 30, 2008 1:27 pm
- Location: Hamilton
Got my stainless fasteners, washers and nuts etc, threw a few of them on there to see how it will look, also got some 25x3 alloy bar for the straps on the exterior as required by msnz.
Started to re-assemble the interior, put the door seals, window seals and boot seal back on. And put the side windows back in. The re-installed my dash, hopefully for the last time.

Also put my battery box in place and had a look at how I will mount it. Need to get some steel and threaded rod to make mounts for this.

In other news, made up a rack to hold my spare wheels out of the way, and give me more garage space.

Also have just purchased myself a Tig welder, so hopefully progress will speed up as I don't have to load the car up and take it to work every time I want to weld something,
Started to re-assemble the interior, put the door seals, window seals and boot seal back on. And put the side windows back in. The re-installed my dash, hopefully for the last time.
Also put my battery box in place and had a look at how I will mount it. Need to get some steel and threaded rod to make mounts for this.
In other news, made up a rack to hold my spare wheels out of the way, and give me more garage space.
Also have just purchased myself a Tig welder, so hopefully progress will speed up as I don't have to load the car up and take it to work every time I want to weld something,
-
last_resort14
- I have stars and not afraid to use them
- Posts: 252
- Joined: Tue Dec 30, 2008 1:27 pm
- Location: Hamilton
Mostly boring progress lately,
Have tidied up all my wiring under the dash, removed heaps of crap i don't need, and connected pretty much all of it.

Everything works! Including switches for lights wipers etc.
Also finally finished mounting the radiator, learning how to use my new welder as i go


Good to have the radiator sitting in there on its own weight.
also had a look at mounting my seat, looks like i might need to find something smaller and remove all of the factory mounting points so its hard on the floor, otherwise with my helmet on, my heads gonna clash with the rollcage
Have tidied up all my wiring under the dash, removed heaps of crap i don't need, and connected pretty much all of it.
Everything works! Including switches for lights wipers etc.
Also finally finished mounting the radiator, learning how to use my new welder as i go
Good to have the radiator sitting in there on its own weight.
also had a look at mounting my seat, looks like i might need to find something smaller and remove all of the factory mounting points so its hard on the floor, otherwise with my helmet on, my heads gonna clash with the rollcage
-
last_resort14
- I have stars and not afraid to use them
- Posts: 252
- Joined: Tue Dec 30, 2008 1:27 pm
- Location: Hamilton
Progress is coming along slowly.
Assembled rest of engine bay, and made up coolant lines. Just have to get some mods done to the radiator inlet pipe.
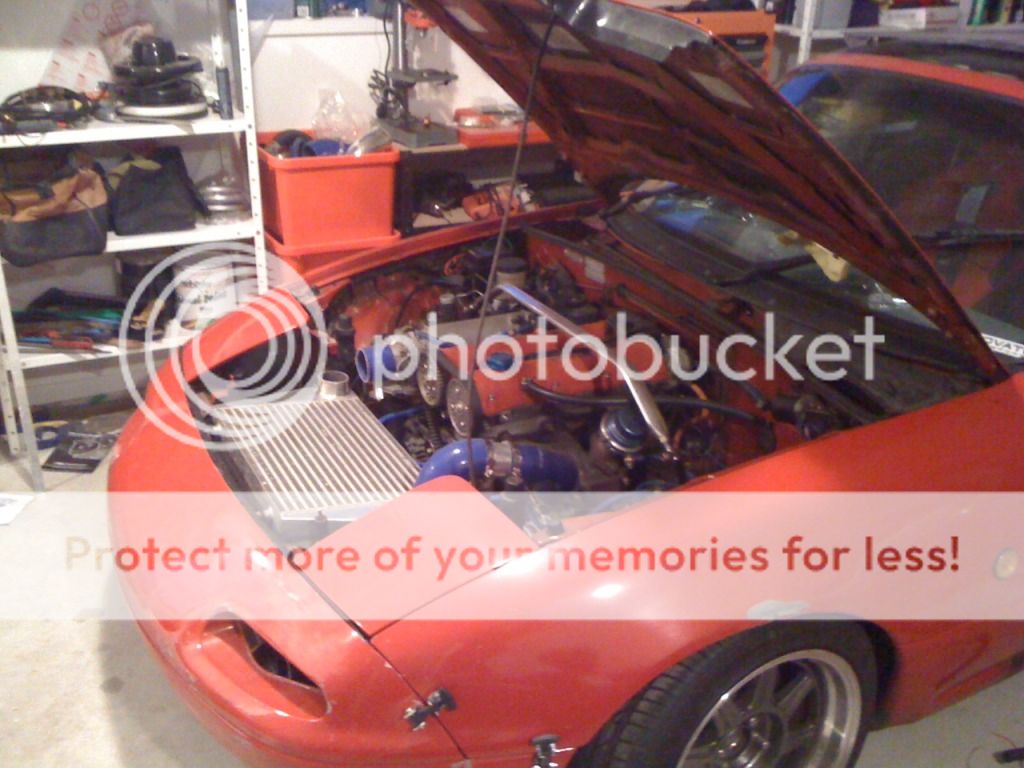
Also had a look at mounting fans, by far looking like easiest way will be mounting on front like so:

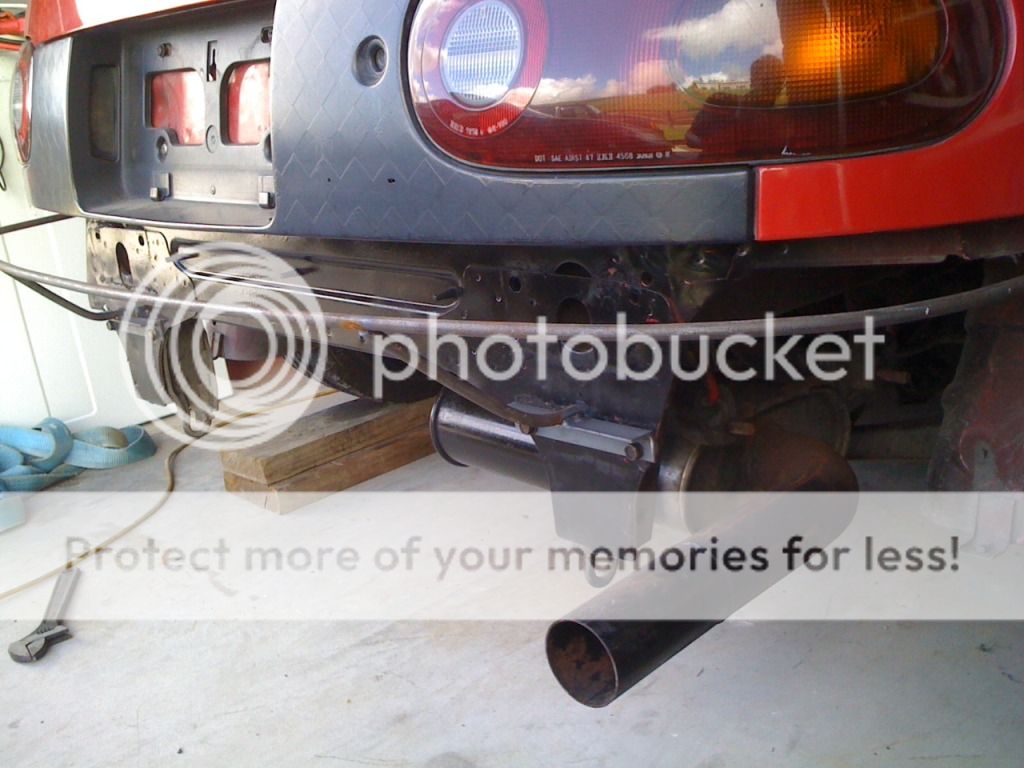
Also did some little cosmetic jobs, Mouning for front bumper using little rubber latches


And made up a support for the rear bumper seeing as I had thrown away all of the bulky plastic brackets
Also heres what it looks like from the inside.

Have purchased 2x new seats and harnesses, and have removed the factory rear seat mounting points from the floor of the car, need to mount the seats as low as physically possible to clear rollcage etc. Will be doing this over the next few days.
Car is booked in back at Sinco next monday to do my radiator mods and coldside intercooler piping.
I have also entered and paid for a Drift day at Taupo on Saturday 6th october. So I now have a dealine which this car MUST be ready by.
Assembled rest of engine bay, and made up coolant lines. Just have to get some mods done to the radiator inlet pipe.
Also had a look at mounting fans, by far looking like easiest way will be mounting on front like so:
Also did some little cosmetic jobs, Mouning for front bumper using little rubber latches
And made up a support for the rear bumper seeing as I had thrown away all of the bulky plastic brackets
Also heres what it looks like from the inside.
Have purchased 2x new seats and harnesses, and have removed the factory rear seat mounting points from the floor of the car, need to mount the seats as low as physically possible to clear rollcage etc. Will be doing this over the next few days.
Car is booked in back at Sinco next monday to do my radiator mods and coldside intercooler piping.
I have also entered and paid for a Drift day at Taupo on Saturday 6th october. So I now have a dealine which this car MUST be ready by.
Who is online
Users browsing this forum: No registered users and 51 guests
