Discussion about MX5s, Roadsters & Miatas, not directly fitting into one of the categories below. Please keep it on topic.
Moderators: LilRay.Sun, Furai, Growler, zorruno, jif
-
MrGrey
- I have stars, you haven't. Deal with it

- Posts: 1172
- Joined: Mon Jan 21, 2013 3:52 am
- Location: Northland
Post
by MrGrey » Tue Dec 31, 2013 6:49 pm
Ok, considering the old thread got locked quite a while ago due to it being 60-70 pages long (and no other reason other than the threads length) I figure a good way to start the new year would be a return of a very popular thread. Hopefully this will free up the general thread for more general stuff whilst giving all the funky DIY stuff we do a place to reside.
Because these threads make for great rainy day reading, if at all possible or relevant, please post pictures as I find its nice to see what other people are working with.
With that being said, today I fit a towbar and made some trim to go around the towbar and around the exhaust out of some aluminum treadplate (painted with heat resistant black paint) and the result turned out quite good.
They are held in place with 3m double sided tape and rivets and I used some silicon RTV around the exhaust trim to tidy up the gaps due to the trims oddball shape


-
Angreal
- I have stars, you haven't. Deal with it
- Posts: 1621
- Joined: Tue Feb 03, 2009 10:13 pm
- Location: At the pub
Post
by Angreal » Wed Jan 01, 2014 2:31 am
completely upgrade the drive train

Last edited by
Angreal on Wed Jan 01, 2014 3:28 pm, edited 1 time in total.
-
4A-GE
- I am quitting my job and going 5-ing

- Posts: 526
- Joined: Wed Nov 20, 2013 2:36 pm
Post
by 4A-GE » Wed Jan 01, 2014 11:45 am
Put a space saver on because puncture.

Pulled out the buggered headrest speakers - Should be off to jaycar for replacements when they open
and I can borrow mummy's card.
Will be pulling out the old stereo at some stage too, so I've got more places to put things.
Anyone with things I should know about the surgery please let me know!

Also, where can I get the cup holder ashtray thing? I'm often pretty good at whorey DIY, but this is a particularly nice interior that could do without my home-making touches.
While it's a shitty day I'll be sorting out a couple guitars for a bloke I know.
-
4A-GE
- I am quitting my job and going 5-ing
- Posts: 526
- Joined: Wed Nov 20, 2013 2:36 pm
Post
by 4A-GE » Wed Jan 01, 2014 11:45 am
Put a space saver on because puncture.
Pulled out the buggered headrest speakers - Should be off to jaycar for replacements when they open
and I can borrow mummy's card.
Will be pulling out the old stereo at some stage too, so I've got more places to put things.
Anyone with things I should know about the surgery please let me know!
Also, where can I get the cup holder ashtray thing? I'm often pretty good at whorey DIY, but this is a particularly nice interior that could do without my home-making touches.
While it's a shitty day I'll be sorting out a couple guitars for a bloke I know.
-
BRM
- I count 5-s in my sleep

- Posts: 379
- Joined: Thu Apr 25, 2013 9:01 pm
- Location: North shore
Post
by BRM » Fri Jan 03, 2014 5:14 pm
Finally gotaround to putting my new front lip on my car the other day.
Gonna bang out some molds with chris and make a bunch
-
4A-GE
- I am quitting my job and going 5-ing
- Posts: 526
- Joined: Wed Nov 20, 2013 2:36 pm
Post
by 4A-GE » Fri Jan 03, 2014 5:46 pm
Today I pulled out the old headrest speaker inserts, articulately butchered some of the foam, and stuck in a pair of fusion 4" speakers per side. Pretty happy; props to Mr Grey for posting the article about it in that other thread I'm too lazy to link to.
-
MrGrey
- I have stars, you haven't. Deal with it
- Posts: 1172
- Joined: Mon Jan 21, 2013 3:52 am
- Location: Northland
Post
by MrGrey » Fri Jan 03, 2014 8:27 pm
Today has been one of those days where things just don't work out quite as I planned. I dried plastidipping my hardtop today and although the finish was ok, at any point where the plastidip touched RTV silicone it would not bind and start retracting. This was un fortunate and unacceptable when painting a red roof black, so I peeled it off and decided to bite the bullet and paint the hardtop with enamel satin black. I also put on some vinyl on the strip at the top of the boot so that I would have a continuous black line.
This is a pic of the hardtop with 3 coats of plastidip... one can really doesn't cut it, for a better finish you really want 5 or so consistent layers

This is from after i said bugger it and sanded the roof and gave it a lick of enamel paint... I will do a few more coats yet. Oh, and look how domesticated I am, doing my washing and stuff (yes, seat covers count as domestic housework in my books)

These next two are just of the vinyl application process. I realize I didn't line up the pattern of the vinyl, but it was an offcut and I had to have it that way to avoid a small tear.


-
4A-GE
- I am quitting my job and going 5-ing
- Posts: 526
- Joined: Wed Nov 20, 2013 2:36 pm
Post
by 4A-GE » Sat Jan 04, 2014 5:28 pm
Tore my old radio out and couldn't find a pockety thing that fits... Grr. Also got bored so I flushed out the radiator and got new glycol mix in the thing.
Man, I have a simple and reliable car, what do I do...

-
MrGrey
- I have stars, you haven't. Deal with it
- Posts: 1172
- Joined: Mon Jan 21, 2013 3:52 am
- Location: Northland
Post
by MrGrey » Sat Jan 04, 2014 7:55 pm
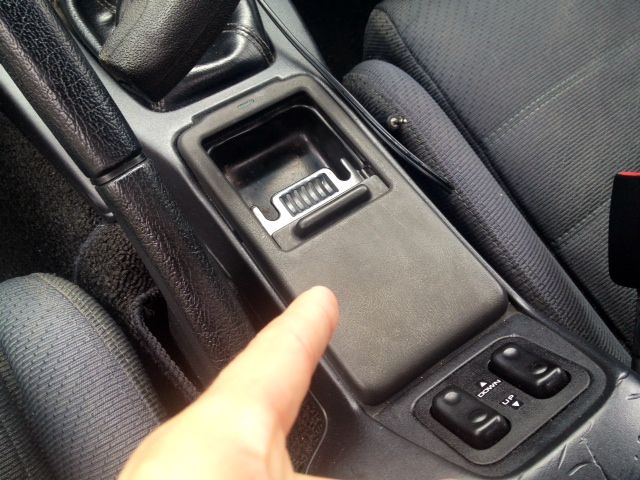
another day, another mod....
I got frustrated with the uselessness of the oem ashtray so glued foam in place, and cut/drilled/shaped it with a holesaw and a craft knife. I am now in the finishing stage where I use no-more-gaps to fill things in and give the final shape (I used a flexible rubber polymer so that I would have a little bit of give and flex)
once it has set, it should look ok with a lick of black paint.
here it is with the front angled cellphone holder looking ok while I carve out the cup holder bit.

most of the shaping is done, now its sanding and filling time before painting.

a test fit to make sure all is snug


-
Snapfrozen
- I am quitting my job and going 5-ing
- Posts: 747
- Joined: Sun Jun 24, 2012 11:58 am
Post
by Snapfrozen » Sat Jan 04, 2014 11:12 pm
Fibreglass mould and go into production. I'd pay decent money for that
-
MrGrey
- I have stars, you haven't. Deal with it
- Posts: 1172
- Joined: Mon Jan 21, 2013 3:52 am
- Location: Northland
Post
by MrGrey » Sat Jan 04, 2014 11:47 pm
My fibreglass work would not be up to standard I feel. However, you do raise a good point so I have emailed Marc at carbonmiata with the concept and pics so maybe he may like the idea and make something nice.
-
siren676
- I have stars, you haven't. Deal with it
- Posts: 1115
- Joined: Fri Jun 08, 2012 12:21 am
- Location: Auckland
Post
by siren676 » Sun Jan 05, 2014 12:01 am
Looks good MrGrey, one thing i'd recommend is to get one of those non-slip rubber pads/squares to put in the phone part to stop your phone from flying around on hard cornering
1990 NA6C MX5
-
MrGrey
- I have stars, you haven't. Deal with it
- Posts: 1172
- Joined: Mon Jan 21, 2013 3:52 am
- Location: Northland
Post
by MrGrey » Sun Jan 05, 2014 3:33 am
Good point Siren, I left the center patch bare and hopefully the matte paint combined with the rubberized base will be enough to keep the cellphone stationary. Well, its 3:30am, I couldn't sleep so I finished off the ashtray mod. Its not as good as a professionally shaped one, but I am happy enough with the result.

-
Snapfrozen
- I am quitting my job and going 5-ing
- Posts: 747
- Joined: Sun Jun 24, 2012 11:58 am
Post
by Snapfrozen » Sun Jan 05, 2014 6:40 am
What would you charge to butcher mine and send me that back? Looks epic.
-
Angreal
- I have stars, you haven't. Deal with it
- Posts: 1621
- Joined: Tue Feb 03, 2009 10:13 pm
- Location: At the pub
Post
by Angreal » Sun Jan 05, 2014 11:43 am
I used to have an MX5mart cupholder and then I ended up doing the nb dash swap which comes with a cup holder. Both have the problem of placing the cup right behind the gearstick but the mx doesn't exactly give you space to begin with
-
CordedBowl
- I count 5-s in my sleep
- Posts: 334
- Joined: Fri Jul 13, 2012 5:12 pm
Post
by CordedBowl » Sun Jan 05, 2014 12:11 pm
Angreal wrote:I used to have an MX5mart cupholder and then I ended up doing the nb dash swap which comes with a cup holder. Both have the problem of placing the cup right behind the gearstick but the mx doesn't exactly give you space to begin with
Thank you for this useful insight!
-
4A-GE
- I am quitting my job and going 5-ing
- Posts: 526
- Joined: Wed Nov 20, 2013 2:36 pm
Post
by 4A-GE » Sun Jan 05, 2014 3:07 pm
Hmm, could we mount fold-down ones on the doors?
I found a mostly suitable radio pockety thing and stuck it in. Pics in my thread.
-
evel
- I have stars and not afraid to use them
- Posts: 227
- Joined: Tue Dec 13, 2011 9:19 pm
- Location: Whenuapai, Auckland
Post
by evel » Sun Jan 05, 2014 3:30 pm
Think the best one iv seen so far was a dude used the screw on the side of the center console by the shifter and just pushed the screw with a big ass washer thru a stubby holder and screwed it in
said screw indicated by arrow.
-
Attachments
-
 Viewed 61426 times")
'94 S-Special 1800 in BLACK
Flares and 225/45 Semi Slicks.
-
DeeCee
- Tentative sideways sliding....

- Posts: 36
- Joined: Mon Jun 07, 2010 2:27 pm
- Location: Auckland
Post
by DeeCee » Sun Jan 05, 2014 4:13 pm
Back to the original subject - took off the hard top (for the first time since i brought the car) and cleaned up the soft top in readiness for a few top down drives.
1992 NA - Red, 92 NA Race Car - Yellow, 90 BRG (a rebuild project)
-
MrGrey
- I have stars, you haven't. Deal with it
- Posts: 1172
- Joined: Mon Jan 21, 2013 3:52 am
- Location: Northland
Post
by MrGrey » Sun Jan 05, 2014 5:53 pm
I'd love to help out guys but I only had a small amount of foam, but the basic concept of it is pretty simple. if it helps, I used a 76mm holesaw to do the top hole.
Well, I am steadily running out of affordable/practical mods to do at the moment, but here is today's efforts. I am waiting on the final coat to dry on the hardtop.... its not in the same ballpark as a professional job, but it should look good enough.


and I finally got around to wiring up my trailer plug. I initially was going to make a bridge between the plugs but that was far to complicated so I instead just chose to keep it simple and lego block it. Rather than having the plug on the outside to slowly corrode in the elements, I instead chose to keep it in the boot as the frequency I will use it will be low. (I'd just hang out the boot when using it.

-
MrGrey
- I have stars, you haven't. Deal with it
- Posts: 1172
- Joined: Mon Jan 21, 2013 3:52 am
- Location: Northland
Post
by MrGrey » Tue Jan 07, 2014 5:07 pm
-
siren676
- I have stars, you haven't. Deal with it
- Posts: 1115
- Joined: Fri Jun 08, 2012 12:21 am
- Location: Auckland
Post
by siren676 » Tue Jan 07, 2014 7:07 pm
Subframe bracing?
Today i installed some new hardtop window seals so i can park my car outside again. Next thing on to do list is raise it to around 295mm hub-arch, get an alignment and then cert
1990 NA6C MX5
-
BRM
- I count 5-s in my sleep
- Posts: 379
- Joined: Thu Apr 25, 2013 9:01 pm
- Location: North shore
Post
by BRM » Tue Jan 07, 2014 7:42 pm
I have a drive shaft.
-
4A-GE
- I am quitting my job and going 5-ing
- Posts: 526
- Joined: Wed Nov 20, 2013 2:36 pm
Post
by 4A-GE » Tue Jan 07, 2014 8:24 pm
+10 man points to mr grey.

Return to “MX5 Discussion”
Who is online
Users browsing this forum: No registered users and 11 guests


